One could write an entire book on this topic but I'm going to focus on a very limited situation, that of servicing common consumer electronics, including audio amplifiers, receivers or video equipment. The principles will be the same for all manner of electronics, but these devices tend to use similar types of capacitor, all too often chosen for price over quality. Though I've no statistics, failed capacitors seem to account for a large number of service calls.
In writing this I've realized that capacitors can be understood on many different levels, from the practical to the purely mathematical. Some of the traditional analogies, like the "bucket of water" analogy are misleading at best. Different datasheets and applications may use slightly different terminology. Power people refer to power factor. Switching supply people talk about effective series resistance (ESR). Traditional engineers may use loss tangent or phase angle. Test equipment makers typically calibrate their dials in dissipation factor (D). OK, maybe you won't find that many dials these days, but it's no surprise if people are confused by the different viewpoints and terminology.
One thing to remember is that whatever system of units is being used, it can be converted to any other system of units. There will always be two numbers that describe capacitance and the unavoidable internal losses. Series capacitance and dissipation factor are the most common, but you'll also find reactance and phase angle or the somewhat obscure G & B. Loss in terms of effective series resistance (ESR) has become a common buzzword in recent years, but it's just the plain old series model resistance term, Rs, that's been familiar to engineers since the beginning of the 20th century.
I have to admit to having some long held beliefs concerning the effect of various capacitor problems on circuits. While writing this I built up some test circuits and installed various caps from my collection of "defective" caps pulled from equipment over the years. The results were sometimes surprising and I've changed my views a bit; some of my advice may now run contrary to conventional wisdom.
Consider the function of the capacitor in the circuit. You need to know what's expected of the capacitor to interpret your measurements and decide if the cap is sufficiently healthy or needs to be replaced. Filter capacitors in mains operated power supplies, usually 50 or 60 Hz, will tend towards large values, usually 1000 uF or more per ampere of output current. With a full wave bridge the ripple seen by the capacitor will be twice the mains frequency, 100 or 120 Hz, so the capacitor's high frequency losses aren't important. The cap does need to handle the ripple current; if the losses are too high internal heating may occur, ageing the capacitor yet more rapidly, leading to premature failure. Note that capacitors in consumer equipment, unlike industrial equipment, are usually chosen to keep ripple to a minimum and do not have to support high current loads or carry high ripple currents. In audio equipment heavy demands on the power supply are usually intermittent. The worst threat is apt to be poor ventilation; watch out for ventilation slots blocked by dirt or surrounding clutter. Another cause of early failure is proximity to a hot power resistor or thermal connection to a hot power resistor via a heavy PCB trace, a subtle design error that happens more often than one might expect.
Note that the amount of ripple will be determined by the series capacitance (Cs), which will be defined shortly. The losses will have no effect unless they're catastrophically high, nor will any other capacitor parameter. If you want lower ripple from a conventional low frequency power supply, you must increase the capacitance value. A cheap capacitor will perform exactly the same as an expensive one, though the expensive one may last longer due to better seals and higher quality construction.
Filters for switching supplies have more of an issue with ripple current and are specified mainly for low ESR (Rs) to keep the internal power dissipation low. Internal power dissipation equals heat, and heat is the enemy of capacitors. In switching supplies the capacitance value is often large and somewhat irrelevant because the acceptable Rs and ripple current rating dictated the component choice, not the capacitance value. When you replace a capacitor in a switching supply it's critical that you know the original ESR specifications and insure that the replacement part is as good or better at the frequency of operation. An ordinary low frequency filter capacitor installed in a switching supply can immediately fail, sometimes violently if it overheats and the can vents or explodes. Always wear safety glasses and don't lean over circuits under test!
Coupling capacitors have to pass audio frequencies up to 20 kHz or sometimes more depending on application. They tend to be used in higher impedance circuits so losses aren't generally an issue. What can be an issue is DC leakage, since the whole purpose of a coupling cap is DC isolation. It's usually be necessary to measure leakage at the operating voltage; an ohmmeter check can prove the cap bad, but it can't prove that the cap is good because it doesn't measure at a high enough voltage.
The non-polar electrolytics used in loudspeaker crossovers are a special case. Since they operate in a low impedance circuit as a filter element, losses are important. If the designer voiced the speaker with a specific capacitor, changing it to another type may very well alter the sound.
Bypass capacitors have to handle high frequencies so aluminum electrolytics are not the preferred type. You may find high performance solid electrolyte (OSCON) or tantalum capacitors, but ceramic and sometimes plastic film are the usual choices. These are all less subject to ageing and failure, but they should be checked anyway as part of a complete service.
Apologies in advance for subjecting you to some theory and math, but understanding these relationships will put you way ahead of those that don't.
There are two types of passive "component" that you can use to build a circuit, resistance and reactance. The reactance can be either capacitive or inductive. An interesting thing about reactance is that it can't dissipate power. Thus, pure capacitors and pure inductors by definition have no losses. Unfortunately they don't exist except on the pages of textbooks. The only thing that can dissipate power is a resistance, and every real capacitor and inductor will have some small resistive component. At least we hope it's small. Here we arrive at the fundamental concept behind this entire article: The ratio of resistance to reactance is a strong indicator as to the condition of an aluminum electrolytic capacitor.
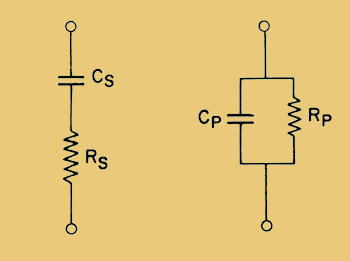
Most of the time we ignore the imperfections of real-world capacitors and treat them as pure reactances. Not so when testing them, since it's the imperfections that make the difference between a good and bad capacitor. Those imperfections show up as resistive losses, leading to two different ways to describe them. One way, called the series model, places a resistance in series with the capacitor. The other way is the parallel model, placing the resistance in parallel with the capacitor. Both models are used for AC analysis, so try to ignore the fact that DC can pass through the parallel model. These models are just a handy tool; they do not reflect the actual "mechanics" inside of a real capacitor. In particular, the models are valid for only one frequency; change the frequency and you need to adjust the model. More complex models are used if dielectric absorption and/or self resonance is taken into account.

Now let's consider capacitance value. Aluminum electrolytics typically have wide tolerances, +80% and -20% is a common spec. The better caps might be as tight as ±20%. That's still a wide range and it means you may not learn much from a simple capacitance reading because you have no idea if the capacitor is as good as the day it was made, or if it has lost a large amount of capacitance yet remains just inside the specification, only to fail completely next week. It may also have high losses that aren't evident in the simple capacitance measurement. We need to measure the resistive losses to get a better idea of the capacitors health.
If you read the 2nd paragraph of this section carefully you noticed that we're really interested in the ratio between the resistance and reactance, not so much the resistance itself. That number is the dissipation factor.
ESR meters have become quite popular because they offer a quick and easy high frequency in-circuit test. Hand held capacitance-only meters and DVMs with a capacitance function have also become popular for the obvious reasons of low cost and convenience. The problem is both pieces of test gear only give you half the information you need. A proper capacitance bridge or meter will give you both the capacitance and the loss. Modern meters, unlike traditional bridges, can often express the capacitance and losses in a variety of units, since it's just a processor calculation, but the most common (and useful) are series capacitance & dissipation factor or parallel capacitance & dissipation factor. In general you'll use the series model for low loss capacitors.
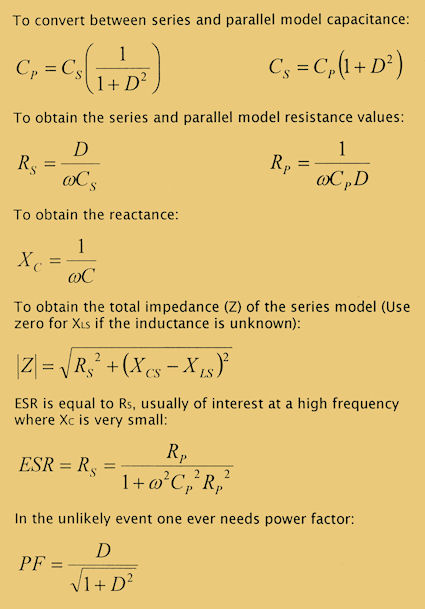
From those two numbers you can derive the series or parallel resistances and a variety of other things. The beauty of those two numbers is that you rarely have to. With a bit of experience, knowing Cs & D will tell you instantly if a problem exists or not. Still, here are some formulas for converting between the two models and for deriving ESR. Notice that dissipation factor never changes between the two models. In the formulas below, C will be in Farads, R, X and Z in ohms, D, the dissipation factor, is dimensionless and omega equals 2*PI*F.
The manufacturers of aluminum electrolytics offer a myriad of different types, most identified by a 2 or 3 letter code. This is usually printed on the side of the capacitor body, along with the logo of the manufacturer. As an example, I've pulled the capacitor below from my "stock" to identify and look up.
![]()
You can see the small rectangle, but it isn't really just a rectangle. It's the stylized shield used by United Chemi-Con, though admittedly you'd only know that if you were familiar with the various capacitor company logos. You can also see the cap is clearly printed with "SXE", the series identification. The value and voltage are obvious, 330 uF at 35 VDC, and on the rear of the cap is the maximum temperature spec of (M)105°C. We also take note of the case size, 10 x 20 mm, since many caps come in a variety of different sizes or aspect ratios, all with the same value, but each size with different specifications.
Armed with that information we can locate the series in the United Chemi-Con catalog and see what else can be learned. We discover that this is a miniature solvent proof low impedance capacitor suited to high frequency switching supply use. Naturally it can be used for any low frequency application as well. Sorting through the various tables we also discover the following:
There is more info available for the circuit designer but what we have is more than sufficient for our purposes. We should also take note of some general trends in the data. The dissipation factor chart is by voltage rating. The higher the voltage rating, the lower the dissipation factor. That explains the generally poor performance of very low voltage capacitors. There is also an adder that states, "When nominal capacitance exceeds 1000 uF, add 0.02 to the values above for each 1000 uF increase." Thus, as capacitance goes up, so does dissipation factor. These trends are typical of all aluminum electrolytics. The company seems to define the end-of-life as the point where the dissipation factor is double the specification, so consider that in the testing of older equipment.
Note how the losses go up with decreasing temperature. If equipment has to run in the cold, make sure the performance of the caps is up to the task. Older caps may work fine warm but because losses have increased over the years, the device may fail when cold. This is another reason not to power up equipment right off the truck in the winter. The other is condensation. Let things warm up to room temperature before unwrapping or powering!
The load life seems very short. Operating full time, 2000 hours is only 83 days! This should be a hint that capacitors should not be operated under conditions that cause high internal temperatures. Operated at normal ambient temperatures, with low ripple current to prevent heating, this same part can be expected to last decades with little degradation.
We want to measure capacitors in-circuit whenever possible. Even though this may affect the results slightly, we're not generally looking for extreme accuracy, in fact there's nothing extremely accurate about aluminum electrolytics to begin with. The big problem is any circuit component that would shunt the capacitor and make it look worse than it really is. We can avoid errors from semiconductors by simply keeping the test voltage lower than the diode turn-on voltage. For silicon parts this is under about 0.7 volts peak, but to be safe let's say 0.5 or 1 volt peak to peak. If you're working on very old equipment with germanium devices your life will be harder because low turn-on voltages and typical leakage will make all in-circuit measurements untrustworthy. You may have to remove caps or other components to get a valid measurement.
What about power supply caps? The problem with power supply caps is that the whole rest of the circuit is usually connected across them. There's bound to be a resistive load of some sort. Fortunately significant losses are usually tolerable. If a low frequency measurement show the capacitance to be about right, and the dissipation factor (DF) less than 1 at 120 Hz, the problems are likely elsewhere.
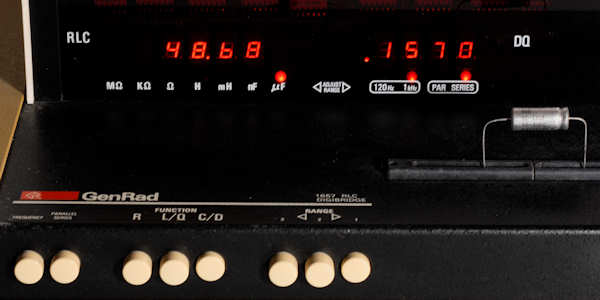
We'll start by measuring a perfectly good Panasonic FC series capacitor on the venerable General Radio Corp. 1657 digital LCR bridge, the first modern digital bridge. Most of the capacitors used here will be 47 uF so we can compare the information obtained using different measurement parameters. The first measurement will be at 120 Hz using the series model (Cs) because the datasheet specifies the capacitance tolerance at 120 Hz. Note that the test parameters are indicated by the LEDs under the digits.
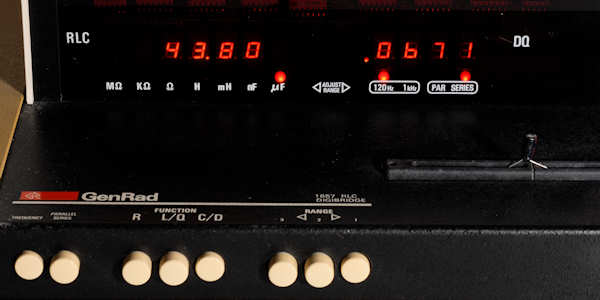
We see a capacitance of 43.8 uF and a dissipation factor (D) of 0.0671. The capacitance is a little low but it's only -6.8%, well within the published spec of ±20%. The dissipation factor is low, which is always desirable, but since these caps are touted for their high frequency performance we need to look at that as well. The datasheet only gives us the total impedance at 100 kHz, ignoring low frequency performance all together.
Most bridges and meters won't go that high, though some ESR meters will. Since we can do a 1 kHz measurement on this bridge, let's see what that looks like.
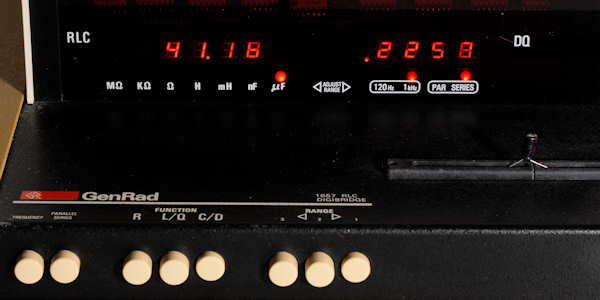
If we calculate Rs, which is equal to ESR, from the above numbers, we get 0.872 ohms. Now, this number is not constant with frequency, but the datasheet gives a value of 0.8 ohms at 100 kHz, so we know we're well in the ballpark. I typically move through the capacitors on a board, making sure the capacitance is approximately the marked value, but paying particular attention to the dissipation factor at 1 kHz. Any DF greater than about 0.4 deserves closer examination. If the cap is used as a low frequency filter I expect a low frequency (120 Hz) DF measurement to be less than about 0.25. Don't get too hung up on the losses. Most circuits will work just fine with higher losses.
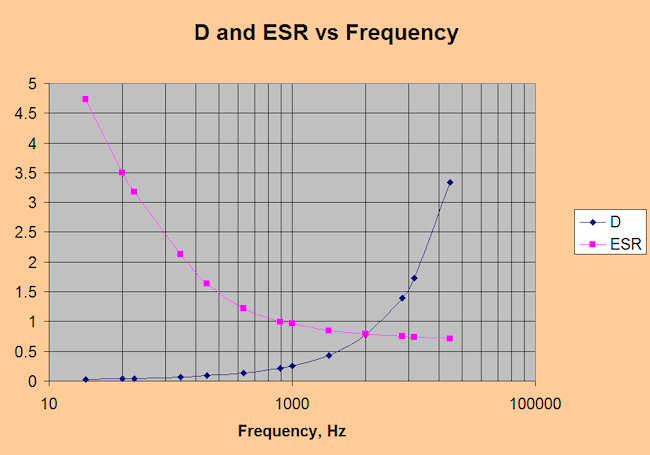
Here's a graph of that same capacitors actual measured performance from 20 to 20,000 Hz. Both dissipation factor and ESR are shown. The scale on the left is both ohms for ESR and dimensionless units for dissipation factor. Notice that when one gets to about 1 kHz, the ESR curve has flattened out and will then slowly decrease as the frequency rises. At some frequency inductance will become an issue and the total impedance of the capacitor will rise. The ESR will generally remain low, but the capacitor will become less effective because the inductive reactance is cancelling out the capacitive reactance. At resonance XL = XC, so they subtract to zero, leaving only the ESR. The phase shift will be zero degrees and you have a resistor! (the graph should have 4 decades but the numbers are correct)
Now we'll move on to a more questionable part. This is a common 47 uF cap that you'd find in all sorts of consumer goods. It's only rated at 10 VDC and my experience is that caps rated for less than 16 VDC show poor performance and have short lifetimes. Here's the 120 Hz Cs test.
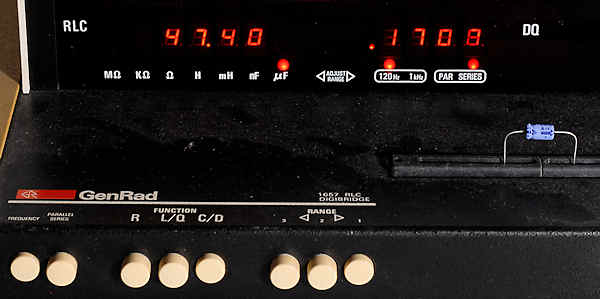
On the surface those numbers don't look too bad. If this cap was a low frequency filter cap it would certainly do fine. If you look at the dissipation factor chart coming up in a bit, the cap is about where they say it should be. Unfortunately these little caps are rarely used in power supplies at 120 Hz, but it would be common to find them used as coupling capacitors. Let's do a measurement at 1 kHz.
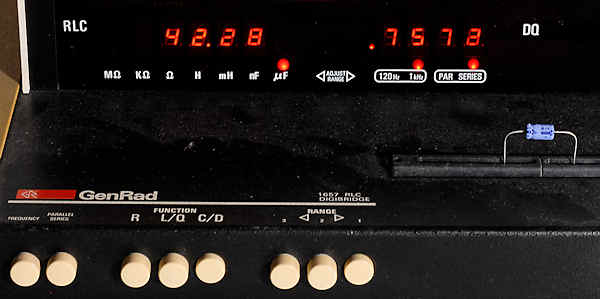
Now things aren't looking so good. That 0.7 dissipation factor is pretty high. If we convert it to series resistance we get 2.85 ohms. The parallel model is 26.87 uf in parallel with 7.82 ohms, not nearly as good as a higher quality or higher voltage cap, and likely to impact circuit performance in some applications. A good capacitor will have a phase shift between current and voltage that approaches 90 degrees, at least at low frequencies. This one is about 52 degrees. As the frequency goes up this cap looks more and more like a resistor. That's not always a bad thing, but it shouldn't be happening at such a low frequency. Now, that's just my opinion on the matter; I don't consider this a high quality capacitor. Still, if the cap is used as a coupling cap, and if the value is good, and if the leakage is low, it will work fine and isn't the cause of a problem. If I found this capacitor in a piece of garden variety consumer equipment that I was servicing, would I replace it? Probably not. If I found it in some higher end audio equipment, in a heartbeat! Modern parts can be way better than that if you choose wisely.
Knowing only the series capacitance value, the thing that most inexpensive meters measure, leaves you lost in the dark. That value of 42.28 uF looked perfectly fine, well within specification, yet the capacitor was of poor quality due to high losses. Knowing only the losses, you can spot some bad capacitors, but not all. An ESR meter is fast, but you should understand why it tells you what it does. In the case of paralleled capacitors one could be missing entirely yet the ESR meter would report a good number. It can also report high ESR for a capacitor that's perfectly acceptable for the frequency it's operating at. In my opinion the ESR meter is still much more valuable than a C-only meter, but you really need both numbers to fully understand and properly troubleshoot capacitor problems.
The $64,000 question is what value to use as a cutoff. If you have a datasheet for the part, it should give some limits. If you can get a datasheet for a similar class of part it should serve as a useful estimate. Hopefully it will specify a maximum dissipation factor, usually at 120 Hz. Here's the chart for a general purpose Rubycon YK series general purpose radial that's typical of most general purpose caps:
| Rated Voltage | 6.3 | 10 | 16 | 25 | 35 | 50 | 63 | 100 | 160 | 200 | 250 | 350 | 400 | 450 |
| DF | 0.26 | 0.22 | 0.18 | 0.16 | 0.14 | 0.12 | 0.10 | 0.08 | 0.20 | 0.20 | 0.20 | 0.20 | 0.20 | 0.20 |
There is a note at the bottom of the table: "When nominal capacitance is over 1000 uF, tan θ shall be added 0.02 to the listed value with increase of every 1000 uF."
So let's say you have a 4700 uF 50 volt cap. The base dissipation factor is 0.12 and because it's larger than 1000 uF there's an adder of 0.08, giving you 0.20 (I rounded the value to 5000 uF). Now, the end-of-life dissipation factor is 2X, so the cap can be considered bad if the dissipation factor measures over 0.40 @ 120 Hz.
This is getting a bit long but I'd be remiss not to show a large value power supply cap. Here's a Sprague "Powerlytic" 47,000 uF 50 VDC cap. Because the value is 47,000 uF, many traditional bridges won't read it at all. Meters like the Digibridge will do it at lower frequencies like 120 Hz, but the impedance is so low that they can't manage it at 1 kHz.
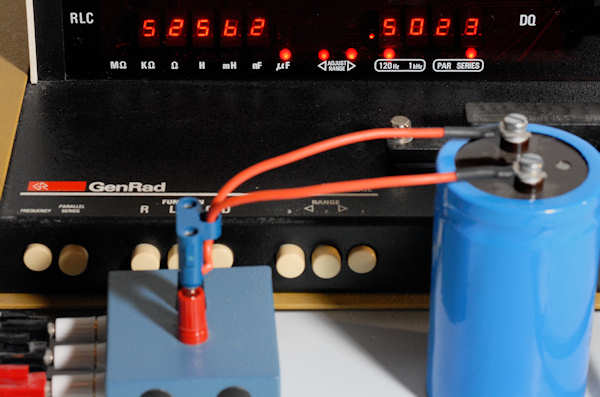
The dissipation factor of these big power supply filters can vary over a wide range, often much higher than the smaller caps. Measured at 120 Hz you can use the same guide as above, but multiplied by 3X. There will not be an adder. You'll need good low resistance leads and possibly a 4-terminal connection to get accurate measurements on the better quality filter caps. Even the arrangement shown, with short heavy leads to a 4-terminal connection, is probably not adequate. Large caps need a formal 4-terminal connection right to the lugs.
DC leakage is a separate phenomena from value and loss. If it's a concern you usually need to measure it separately unless you have a bridge that includes leakage testing. The leakage resistance of the cap often doesn't incur enough loss to change the C & D readings, but offers plenty of current to disturb circuit operation. Most caps that measure OK for value and loss will have acceptable leakage, with the exception of high voltage caps. With those, acceptable leakage can't be assumed. Some circuit locations are extremely sensitive to leakage. A cap isolating the grid of a tube is a good example. An old Black Beauty paper cap may measure perfectly in every respect, but have so much DC leakage that it shifts the bias of the tube, resulting in a seriously distorted waveform. Fortunately good designers don't use aluminum electrolytics in sensitive locations, and paper/oil caps are uncommon these days. You'll almost invariably have to remove capacitors from the circuit to test for leakage because you don't want to expose the rest of the circuit to the voltages involved.
To measure DC leakage you'll need a power supply that can reach the maximum voltage rating of the capacitor. Connect the capacitor to the supply through a current limiting/sensing resistor and measure the voltage across the resistor. Calculate the current, and the resistance of the capacitor (if desired) using ohms law. Be sure to take all necessary safety precautions with both high and low voltage caps since they can store substantial energy. The supply should be current limited in case the cap shorts. I use a disposable 1/4 W sense resistor and DVM as described below, rather than a current meter, in case of failure.
As an example we'll use the United Chemi-con cap above. Since the spec is 115 uA, it would be convenient to choose the resistor such that 100 uA gives a 1 VDC voltage drop. 10 kohms (1 / 100E-6) fills the bill. Since the typical DVM has a 10 megohm input impedance, we don't need to correct for that. The cap and resistor are connected in series and 35 VDC applied. The voltage across the resistor starts out at 35 VDC and falls as the capacitor charges. The official measurement doesn't start until the cap is fully charged, but even after 19 seconds the voltage across the resistor has fallen to 1 VDC, so the capacitor is well within the leakage tolerance. After a few minutes it fell to 10 mV, or 1 uA, and was still dropping.
Leakage limits will commonly be specified by a factor of C*V. A common spec would be 0.03CV or 4 uA, whichever is greater. Since you're typically using uF and looking for uA, no conversions are necessary. Just multiply the capacitance in uF times the rated voltage times the multiplier. Specifications don't typically allow increased leakage over the life of the cap, unlike dissipation factor, which is allowed to double.
If a high voltage cap fails the usual low voltage tests, you can be sure it's bad. If it passes the usual low voltage tests, that does not mean it's definitely good! It may break down completely at higher voltages, or the leakage current may suddenly increase above a certain voltage, clamping almost like a zener diode. These types of failures aren't common in low voltage circuits, but seem to be frequent with high voltage tube equipment.
A bit of DC leakage isn't so serious in low voltage circuits, but consider a tired old quad filter cap with a leakage of 2 mA in each section. A not uncommon situation with older equipment. At 400 VDC that's 0.8 watts per section, or a total of 3.2 watts for the can. It will heat up quickly and total failure is just around the corner.
If you're checking HV caps, it's critical to check DC leakage at the operating voltage. If caps are running warm, shut the unit down and find out why. There is likely a ripple current problem or a DC leakage problem that needs to be fixed before the unit is put back in service.
High voltage equipment often has very little safety margin on capacitor voltage ratings, and equipment originally designed for 115 VAC operation may be running on the edge at 120-125 VAC. A power supply designed for 425 VDC on a 450 VDC capacitor at 115 VAC will have 462 VDC on that 450 VDC cap at 125 VAC. Unload the supply a bit by removing some downstream component and you have the recipe for rapid failure. Add in years of operation at the higher temperatures found in tube equipment and it's a wonder the poor capacitors survive as long as they do.
Modern test equipment isn't designed for high voltage testing and some older "TV grade" service equipment is actually far better for the task. Discussions of this equipment come up frequently on the antique radio forums. If you work on tube equipment you need test equipment that works at the actual operating voltages, or you need to be very conservative and sometimes replace parts just for peace of mind and confidence that a customer won't be making a return trip with something you supposedly "fixed".
When capacitors are made the manufacturer places a voltage across the terminals to form the oxide film on the plates, always a higher voltage than the cap is rated for. The oxide film is semi-permanent, but if the cap sits unused for a long period of time, the oxide film can degrade. This makes the capacitor vulnerable to shorting out the first time power is applied. Thus the advice to slowly power up old equipment using a Variac. This builds up the oxide film until it can support the full operating voltage. When a new or long-unused cap is installed in a circuit and first powered up, it will have a significant leakage current. This current falls off for quite a long period until it reaches near zero. The process can actually take days to weeks before the minimum current is observed.
Remember that significant leakage current equals heat being generated inside the capacitor. When powering up old equipment, don't assume that all is well just because the caps support the working voltage briefly. Failure can occur as the cap heats up because the leakage current is still too high. When bringing old equipment back to life, raise the voltage slowly and in several stages. Power down frequently and allow the caps to rest and cool off internally. Then, after half an hour or more, power up again to a slightly higher voltage. After the caps have accumulated some total power on time, they'll have a better chance of survival. That said, if they still fail standard tests, replacement is the only remedy.
After many years of operation, caps will have "adjusted" their internal oxide layers for the applied voltage. If the voltage is increased for some reason, say a high line condition, the DC leakage current can increase tremendously, possibly initiating a failure. Entirely speculation on my part, but this may explain why capacitor replacement in older tube equipment is so universally recommended; new caps can handle surge voltages much better than old ones, unless they've been reformed to their full ratings.
So many times I've measured a capacitor and immediately questioned its health because the value was slightly low. Not out of spec, but just 5-10% low. Surely the manufacturer aims for the value printed on the cap– or do they? Though I have no proof, I'll suggest that they don't. With automated equipment the manufacturer can probably hold the tolerances far closer than needed, and might well aim for a value that's below nominal, yet always above the minimum. Why? Because saving a few percent on the expensive etched aluminum foil, plus the separator paper, will save big money over a long production run. It takes less surface area to produce a lower value cap and I'd be amazed if some manufacturers weren't taking advantage of this on the highest volume parts.
You will sometimes see see capacitors that measure substantially higher than nominal. The tolerance on many caps was as high as +80%, but it would be rare for them to be that high when new. What happened was that chemical changes over time caused the value to increase. Unfortunately this is a sign that the caps are near the end and need to be replaced. It's interesting to note that, for the moment, those caps are probably doing a better job of filtering at 120 Hz than the new replacements will do. Still, they're toast, so get 'em out of there. I tend to see this increase in value with caps that are 30+ years old.
This complaint shows up frequently on Internet circuit forums and has probably caused the unnecessary replacement of untold numbers of capacitors. The brown goo is usually just adhesive that any sensible manufacturer squirts on the board to hold the larger capacitors in place. If they didn't use it, vibration in shipping could easily cause the leads to fail or pull out, resulting in a DOA unit. A tall capacitor with a small base creates a good lever arm on the leads and extra support is always a good idea. Capacitor makers will tell you that a complete ring of glue is a bad idea because it traps anything that does leak, and prevents proper venting of the capacitor to relieve pressure in case of a failure.
Since doubt always exists about the brown deposit, let me point out that aluminum electrolytic capacitors are not filled with large quantities of fluid of any type. The internal paper will be moist, with possibly a few drops of condensation on the inside of the case, but there is rarely enough electrolyte to come spilling out of the case to form a giant puddle on the circuit board. That said, a major failure of a big high voltage cap that causes it to explosively vent can put a thin film of electrolyte on just about everything in the chassis. Aluminum electrolytic capacitors use a brown paper separator, so an old capacitor that has vented or had a seal failure may yield a brown deposit. If the deposit has a slightly crystalline appearance or is at least somewhat soluble in water, it's electrolyte. Note that it's corrosive and will strip the solder mask off a board over time, also blackening the copper underneath. Clean it off as completely as possible and replace any nearby parts with corroded leads.
The glue some manufacturers used has also turned out to be corrosive over time. A search of Internet forums will pinpoint specific receivers and other electronics where this is a known problem. It can eat through radial capacitor leads and corrode other nearby components. It's a lot of work, but in a complete rebuild as much glue as possible has to be removed. A small X-Acto knife with a square end is handy for this.
The manufacturers probably aren't going to tell you the details, but the traditional electrolyte used in 85C caps was a glycol/borate system, specifically a mixture of ethylene glycol (yes, antifreeze) and ammonium pentaborate. Or, they used boric acid and bubbled ammonia through the mix. The performance of this mix leaves much to be desired at low temperatures, nor does it give low esr. Adding more water will lower the esr, but reduce reliability. Makes you wonder about cheap low esr caps used in computer power supplies that seem to fail so often. Higher performance caps use more advanced electrolytes and additives to achieve wider temperature range operation and low esr without a reliability penalty. All electrolytes are toxic so avoid contact with electrolyte deposits from vented caps and wash thoroughly with soap and water if contact is suspected.
All electrolytic caps will eventually fail due to internal reactions that destroy the dielectric. The progress of these reactions is determined by the factors listed above and can be remarkably slow or disturbingly fast. Starting from the top, a general rule is that capacitor life will be reduced by 50% for every 10C increase in operating temperature. 105C caps should last longer in most cases because the safety margin is higher. Heat may be from outside sources or generated internally due to ripple current. Usually both!
Older literature referred to a power law that said cap failure rate was inversely proportional to the operating voltage raised to some power, N. The problem is that N varies over a huge range, maybe 2 to 10, depending on the capacitor "recipe". The information is still useful because it tells us that operating near the voltage rating of the cap is worse than allowing some safety margin. An operating voltage of about 60% of rated voltage is a good place to start, if size and other factors allow. Also, avoid caps with ratings under 16 VDC as they have a higher failure rate. There is no downside to running modern caps well below their maximum voltage rating.
There is a certain amount of paranoia concerning capacitor seals but they're usually a minor issue. They are not tires and they are not generally exposed to mechanical stress, ozone and ultraviolet light. Seal materials in any quality cap are chosen for extremely long life and compatibility with the electrolyte. That said, if you lose the seal, you lose the capacitor, so buy quality.
There are many capacitor "recipes" and they break down at different rates. The only advice I can offer here is to buy premium long life parts. Manufacturers catalogs all list products with lifetimes of 2-3X over their standard parts. You may pay a bit more but it's money well spent.
Contamination is mostly a manufacturing issue. An aluminum electrolytic capacitor with the smallest amount of chloride (and certain other contaminants) will rapidly degrade and can fail within weeks of manufacture. One fingerprint on the internal materials is all it takes. Buy from well known and established suppliers. There used to be an issue using chlorinated solvents to clean circuit boards. If the solvent managed to get past the seals, the cap life would be degraded. Most caps are now solvent resistant, but check the datasheet. Try to keep cleaning solvents away from electrolytic caps, especially the seal end.
Electrolytic caps, like most electronic components, suffer from a certain amount of infant mortality. They display the usual "bathtub" curve where there's an initial failure rate followed by a long trouble-free service life, after which the failure rate rises due to wear-out mechanisms. Those initial failures at the beginning of service are the result of defects in the foils, paper or other details, so don't assume that changing out capacitors that have a proven history of reliability, with brand new unproven parts, will somehow guarantee zero failures. It won't. You can, however, improve your odds by buying "hi-rel" parts that should have a lower initial failure rate. Realistically, hobbyists and small shops have statistics on their side because the number of caps used is quite small. Most of us will never get a defective cap from new production.
Please remember that everything stated above consists of generalities distilled from manufacturers literature. It isn't close to absolute and your (and my) experience with a small sample of parts may not follow the "rules".
Capacitors degrade as they age, both on the shelf and inside operating equipment. The capacitor tested above was a NOS part only a few years old. The entire bag has high loss, though I have no idea if the numbers are normal for this part. Many failures on older equipment are due to failing capacitors. Beyond a certain age, it seems to make sense to do wholesale capacitor replacements when equipment is in for service. But, hold off, it could be a Bad Idea!
Like a doctor, the service person should "do no harm". Doing needless component replacement often tears up circuit board pads and traces. It also contaminates the board unless you're careful to clean it. It may make a classic piece of equipment even more non- original. Worst of all, the original capacitors may still be of better quality than the ones you're installing. As counter-intuitive as this is, there were many series of Sprague and other makers capacitors that were incredibly good 30 years ago, and remain so to this day. As an example, here's a Sprague 30D cap that's well over 30 years old.
It has lower losses than the fresh and well respected Panasonic FC up above. It's quite large and would handle far more ripple current. It will probably outlast and outperform several replacement caps unless you can find something of equal quality. Only a fool would replace it with a new cap. Many of the old caps with epoxy end seals are even better. I have test equipment that's going on 50 years old and the caps show no sign of decreased performance. Now, you'll certainly find bad capacitors and should replace them. You'll even find bad Sprague 30Ds, but replace parts because they're bad, or because they have some physical problem, or because they have a history of failure, not just because they're old.
One place where I do recommend wholesale replacement is where an instrument contains a large number of similar caps, and more than a few have failed or show high dissipation. This seems to be common in '70s audio receivers and some video equipment. In those cases you can easily predict the future, and the future is bad; go ahead and stave off trouble by getting them all out of there.
Everybody wants a rule of thumb for when to re-cap and it's a tough call. I can say from personal experience that when equipment hits about 30 years old, some occasional cap failures are to be expected. Sometime between 30 and 40 years old you have a choice- make the measurements and replace as needed, or do a wholesale replacement on general principle. Many caps will be in good health well beyond 40 years, but the failure rate will be increasing rapidly for others. One factor that can justify wholesale replacement is that aging caps will develop excessive DC leakage. Since they have to be removed for this test, it makes sense to replace them unless they're large and expensive power supply cans.
Beyond 40 years you'll find FP and similar multi-section cans, usually in tube equipment. They may still be functioning in the circuit, but are usually beyond their service life and will test poorly. My experiences with multi-section twist-loc caps of that age have not been good and replacement is the rule of the day. That also goes for paper/wax caps and even certain brands of old silver-mica caps that tend to develop high DC leakage.
The harder it is to get something apart to service it, the more sense it makes to simply replace everything when it's apart!
You have to work to your own comfort level. No one can say with absolute certainty if a given capacitor is going to fail in an hour or in a year, though it would be very rare for a cap that measured close to its nominal value, had low losses and low DC leakage to suddenly fail, regardless of age. Also note that brand new electrolytic capacitors have a non-zero infant mortality rate due to fabrication and contamination issues. If your experience includes a lot of hot high voltage tube equipment you'll likely be more conservative than I am. If the consequences of a failure are particularly serious, you'll also be more conservative. Service is a balancing act; do what's appropriate for the situation.
Various imported bench and handheld LCR meters have appeared on eBay recently. If you search on LCR meter and dissipation factor, you'll see what appear to be some very capable instruments for $200 and up. Though I haven't actually seen one, they appear to be a far better deal than what's been available to date.
It just shouldn't be this hard or expensive! There are very few affordable handheld LCR meters that include dissipation factor. Bench models invariably do. I hesitate to recommend the old General Radio 1657 that I use, since many need service after all these years. Still, if you find a good one, it's a great troubleshooting tool. The older mechanical bridges like the GR1650 usually need some TLC, and they don't cover the larger value caps often found in audio equipment. They are also quite slow to operate. The GR1617 does cover a wide range, and has high voltage bias built in as well, but they tend to sell for rather a lot. They also use a rather rare and expensive tube in their power supply. If you service tube equipment, the GR1617 simply can't be beat. I've no experience with them, but you might also look for the Motech MIC-4070D, the Tonghui TH2821, the B&K 830C or 890C, the GWInstek LCR814 or the Agilent U1731C. The Tenma below has also come down in price and features D/Q and multiple test frequencies.
Finally, there's a simple DIY bridge over in the download section of this site. It will do everything you need, except leakage, and with a well stocked junkbox you can build it for just a few dollars.
A nice little $25 component tester has recently become available from several sources. It's based on an Atmega microprocessor and will give you both value and loss. Some versions can also test transistors and the version level can change quickly, so do your research before buying. Here's a good place to start reading.
C. Hoffman
last edit August 25, 2016